

Please note that this is a continuation of a project we put together for a client starting a new business in the construction area.
A. Selected the new domain name for the client. On the host, we purchased the Domain Name and Hosting services for a year. The Domain was validated and assigned to the BlueHost account. For this blog, we will call it “WebsiteDesignNearMe.com“, a shameless self-promotion SEO tag. You will not be able to change or view the DNS setting until the Domain is validated and assigned.
* Validation Process: Upon purchasing a domain or transferring a domain to a new hosting account, your email used to register the account will receive a link to validate the Account and Domain Name purchase. IT MUST BE A CURRENT WORKING EMAIL THAT YOU CAN ACCESS AND USE. Do not use the email that you plan to create.
* Assigned Process: This is very important that this be followed precisely. BlueHost will permit you to create a hosting account without a domain name. If you use this process, a temporary fake domain name will be assigned to the account like “BlueHost.Me”. Once the Actual Domain is attached to your Cpanel, you can assign it to a folder on the server’s html_public directory with any name you want. Now all work must be conducted and saved into that folder. If this is a single website you are creating on this hosting account, I suggest you call BlueHost and ask that you assign your Domain Name as the primary on the account. It takes 15 to 20 minutes once connected to BlueHost support. It will help with Email flow and SEO.
B. On the hosting site, we created a new email called Robert@ WebsitesDesignNearMe.com. You can do this from the Advance -> Email -> Email Account menu in Cpanel.
C. From Office.com, created a new Microsoft Office 365 account. Create a new User account with the following name, websitedesignnearme.onmicrosoft.com (sub in your domain name for your account). Then make the email for the owner/admin on the account in the user section in Office 365 called robert@websitedesignnearme.onmicrosoft.com.
D. On the new BlueHost account, the DNS will have the generic setting set but will need modifications.
(a) Login to your Bluehost account, and it will take you to the Cpanel.
(b) Click on the Domains menu on the left side of the Cpanel to list the Domain(s).
1. I assume that the Domain is assigned to the account with a folder.
(c) Click on the Manage button and select the DNS menu item.
(d) In the Office 365 account, we want to add a domain. You must have Admin Rights to process these steps.
1. Click on the Microsoft 365 admin center
2. Select Settings
3. Select Domains
4. Click on the “Add Domain“
Enter the Domain name that you created:
1. Enter your domain name, websitesdesignnearme.com, and press the “Next” Button.
2. Select “Add a TXT record to the DNS record” and click the “Next” button.
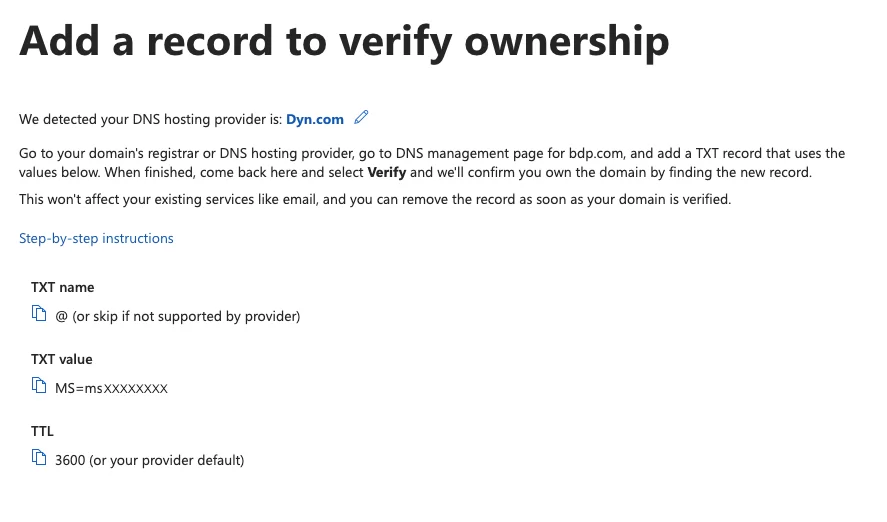
3. Now you need to prove that you own the Domain Name and your BlueHost.com account. Use the MS code to verify ownership. See Graphic “Add a record to verify ownership” Copy the MS=msXXXXXXXX number.
4. Back on the BlueHost DNS TXT section, add a New Record. Use the @ character and fill out the Host Record and save it. It should look like the Graphic below called “Setup Microsoft Office Exchange Setting On DNS TXT Record“. On the TTL setting, select 4 hours. Don’t worry; it will not replace the current @ record. Click save.
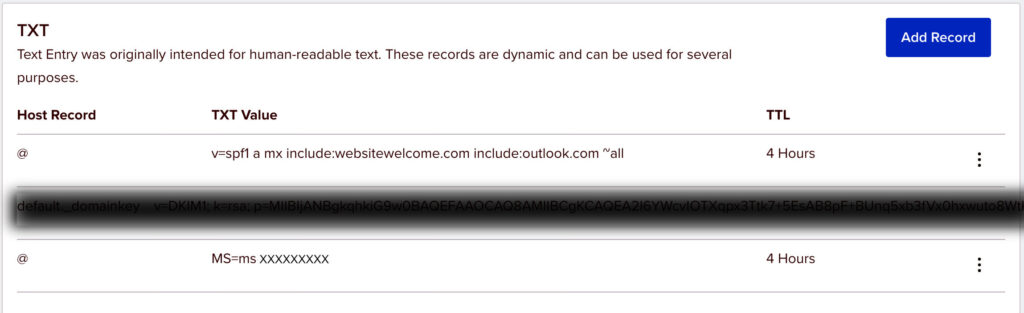
Setup Microsoft Office Exchange Setting on DNS TXT Record
5. On the TXT section, there will be and addition @ Host Record, and please select the three dots to edit this record. Fill it out as shown above in Setup Microsoft Office Exchange Setting on DNS TXT Record below by adding “include:outlook.com.” Then Click Save.
6. Wow Great. Let’s give some time for the internet to sync up. Find something to do for 20 to 30 minutes. We have a suggestion:
a. Record these new accounts and passwords in a master document and lock it up.
E. Break is over. You created the master document with all the logins. 20 to 30 minutes have gone past. Make sure you are still logged into the Bluehost and Office accounts. In Office, click the “Add a record to verify ownership” click Verify Button. It should have verified the MS#. If it doesn’t, check all the settings you created and wait for another 30 minutes.
F. Back to BlueHost DNS. You need to add the following to the DNS settings:
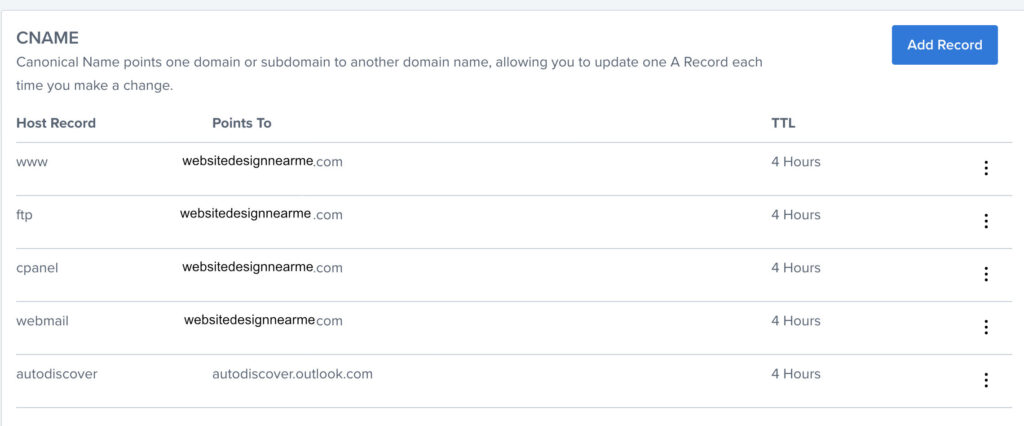
1. Cname Add Record:
(a) Host Record: autodiscover
(b) Points To: autodiscover.outlook.com
(c) TTL: 4 hours
2. MX Add Record:
(a) Priority: 0
(b) Host Record: @
(c) Points To: websitedesignnearme-com.mail.protection.outlook.com (Replace with your domain name. Make sure you use dash-com instead of dot-com domain name.)
(d) TTL: 4hours
Other Remove all other records in this section.
* Click On “MX advanced setting” link and select “Remote Mail Exchange“

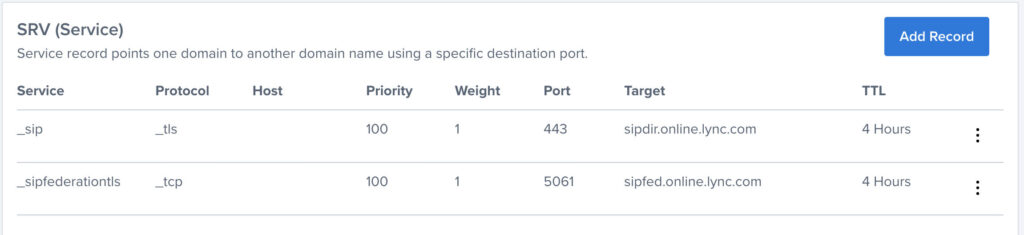
3. SRV (service) Add Record:
(a) Service: _sip
(b) Protocol: _tls
(c) Host: Blank
(d) Priority: 100
(e) Weight: 1
(f) Port: 443
(g) Target: sipdir.online.lync.com
(h) TTL: 4 Hours
4. SRV (service) Add Record
(a) Service: _sipfederationtls
(b) Protocol: _tcp
(c) Host: blank
(d) Priority: 100
(e) Weight: 1
(f) Port: 5061
(g) Target: sipdir.online.lync.com
(h) TTL: 4 Hours
G. Go Back to the Office.com account Microsoft 365 admin center and finish setting up the Domain. In the Microsoft 365 admin center Domain (Home > Domains) page, you should see both websitedesignnearme.OnMicrosoft.com and websitedesignnearme.com. There should be a Status of Healthy and a green checkmark.
H. On your websitedesignnearme.com on this page, click into it and set it as DEFAULT on this page. You should see all your setting from Bluehost here.
I. In Microsoft 365 admin center, select Users > Active users. If the users still have the OnMicrosoft.com email, click on each user. On the Account menu, select “Manage username and switch them from websitedesignnearme.OnMicrosoft.com to websitedesignnearme.com.
J. Test out the email in your browser in the Office.com Outlook App. Send an email from websitedesignnearme.com to the original email from which you created your accounts.
K. Hurray!!!!! You did it.